Information for Professional Jewelers
Satisfaction Guaranteed : Or Your Money Back!
Let your customer wear her ForeverFit™ for a week or so before installation. If she (or he) is not completely satisfied, return it within 30 days of purchase for a full refund.
In the unlikely event that the installation process goes awry, you may return the ForeverFit™ ring "in pieces" for a complete refund (minus the spot price/cost of any missing metal)
In the unlikely event that the installation process goes awry, you may return the ForeverFit™ ring "in pieces" for a complete refund (minus the spot price/cost of any missing metal)
Quick, Easy Installation
Easy as half-shanking any ring.
No special tools or jigs required.
Easy as half-shanking any ring.
No special tools or jigs required.
Easiest for your Customers
Slips on... slips off... No buttons, no levers. No glasses required.
No poked fingers - No broken nails - No pinched skin
Self Adjusts Over 3 and a Half Sizes
Instantly adjusts to changing ring size.
No disappointment when your customers' new hinged rings no longer fit comfortably.
Can't Open Unexpectedly, Rings Stay Safe and Secure
With hinged shanks the latching mechanisms tend to wear out over time and open accidentally risking the loss of a precious ring and exposing you, the jeweler to a potential liability issue.
Installation - Easy as half-shanking any ring
1. Measure the knuckle size as usual - a comfortable slide over the knuckle allows for a little future growth. Order a ForeverFit™ to the next whole size up.
2. Shape the customer's ring to this knuckle size if necessary.
3. Mark the point on the customer's ring where it best matches the width of the ForeverFit™ and mark the corresponding point on the ForeverFit™ shank.
4. Remove the lower portion of the customer ring and upper portion of the ForeverFit™ shank (ForeverFit™ allows you to retain most of the customer's original shank - approximately to the 4 o'clock and 8 o'clock cut point). Note that removing the upper portion of the hinge slot will not hamper the manual travel of the sliding hinges.
5. Solder or laser weld the ForeverFit™ mechanism to the customer's ring. There is no danger of "freezing" the mechanism as no solder is used in the assembly. The stainless spring is easy to remove as it simply "floats" under the moving finger cradle. Grip one end with tweezers and slightly curve the spring to ease it out of it's channel. This is particularly advisable when torch soldering to avoid the loss of spring temper due to excessive heating. If you choose no to remove the spring, do not compress the spring while soldering, as this concentrates the heat. The stainless steel spring is not affected by a brief immersion in the pickle solution.
6. Blend and polish the joints as usual. If rhodium plating, replace the spring afterwards.
6. Blend and polish the joints as usual. If rhodium plating, replace the spring afterwards.
Note: The ForeverFit™ components are a precision fit; so do not attempt to alter the ForeverFit™ shape before or after assembly. Encourage your customer to come in frequently for a free ultrasonic cleaning and to avoid loading up the mechanism with soap scum, grime or dirt.
To create a solitaire mounting simply match the top of the ForeverFit™ shank to accept the desired head.
For later maintenance, complete disassembly of the ForeverFit™ is easy
The .021 pins used in the assembly are a press fit. They may be pressed out with a mini arbor press or simply reverse a #77 or smaller drill bit in the chuck of a small drill press. Leave about a ¼” or less of the drill shank extending, and presto — you have an arbor press for this and other similar tasks around the shop.
The pins may be replaced with wire drawn full hard to .021, tapered for insertion, and then trimmed flush. A little burnishing helps “rivet” the pin in place the second time around.
Tech Tips for Springs
1. The leaf spring “floats” in the channel of the ring shank and may be removed for ring cleaning and adjustment of the tension.
2. The spring material is supplied with a medium temper. It may be shaped on a ring mandrel to increase or decrease the upward curvature and therefore increase or decrease spring tension to suit customer preference.
3. When replacing a spring it is important to use the correct length spring for the customer’s ring size. One particular length spring will perform properly over two consecutive ring sizes.
4. Always ensure that the ends of the replaced spring are smooth with no burrs, corners are rounded and polished smooth. This is especially critical when cutting a new spring from Reller supplied spring material. A burr here can act like a tiny graver and dig into the soft gold of the channel and prevent the spring end from sliding freely.
5. Before Replacing a Spring check to see that the Mechanism is free of debris or soap build-up and that the channel is smooth. After ultrasonic and steam cleaning, a drop of light machine oil or graphite applied to the mechanism restores lubrication minimizing wear.
6. The finger cradle should move vertically in the plane of the ring with a minimum of side ward play. One millimeter is normal. Also, the cradle should not rock or tilt, but remain parallel to the bottom of the shank within about 10 degrees. Excessive play may permit the spring to pop out. Excessive play often indicates that the ring has been worn in an abrasive environment or received a damaging blow. Quite often side-play can be removed by gently squeezing the channel to close it up a few thousandths, taking care not to bind the sliding hinges. This technique can also work on the cradle. If necessary, replacement parts are available from Reller at nominal cost.
Making Your Own Springs from Reller Supplied Spring Material
7. Specifications — 21/2 mm or 4 mm width use 2 mm spring stock;
6 mm width; use 4 mm spring stock
Required Spring Length — Ring Size Length
4 15mm
5, 6, 7 17mm
8, 9 18mm
10, 11 19mm
12, 13 20mm
Display Tips
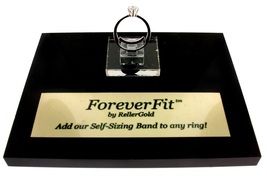
A sample ForeverFit™ CZ Solitaire in Sterling Silver is available from Reller at a nominal charge. The sample comes with a black slab and inscribed plaque with ring stand and counter display for $35 (including shipping).
The ForeverFit™ Self Sizing Ring is also very effectively displayed by reversing a standard “finger” type ring stand and loosely sliding on the ForeverFit™, showing the mechanism in action.


